Friday, September 28, 2012

Wishing you Happiness

My image and Sentiment is from Lili of the Valley today.  I created her for a few challenges Lili Of The Valley All white with a hint of color


She is colored in Copics and 2 colors of liquid pearl surround her.  I used a Cheerlynn "Italian Flourish" doily die behind her and then crimped cardboard painted with creme paint.


In the left hand corner is a Magnolia doohickey cloud with Stampin Up butterfly sizzlit.  Then below is a layer of burlap painted cream, DP, Magnolia doohickey lace edge, flowers, and fence.  A little pom pom in between the two fences and few pearls here and there.


The right side is a bigger Stampin Up sizzlit butterfly with pearls and burlap bow. I also used feathers and WOC flowers to adorn the fence area.


Just a little closer


A different view


Thank you for stopping by and looking around today.
Hope this weekend brings you Happiness!!
Kelly

Thursday, September 27, 2012

Fancy Dance

Good Morning to you all!!  A very girly card made from Best Creations, "Ballet Princess Glitter Papers"  It is a 6x6 pad of ballet and dancing, so pretty and the die cut papers are perfect for using in a scrap book.  I just love the curtain with the piano and Tilda Learning to Dance.


She is dancing on a stage of clouds, (ribbon from Joannes). The flowers are WOC and the dies are Die Version.  The Sentiment and matching banner die is from Stampin Up.


A peak from above


I would like to enter this card into the following challenges
Thank you for stopping in to visit!
Have a great day
Kelly

Wednesday, September 26, 2012

Bootiful

Halloween Cards are not my thing.  I struggle with them but I love what other's look like and the cute sayings that people put with their cards.  I have a few stamp sets for the occasion but I always reach for girly and Christmas stamps this time of year.


Tilda is embossed behind the Copic colored one.  I wanted that eeerry shadow effect.  I distress inked around the circle and on the crocheted doily under the circle.  I placed black stickles around Tilda.
I used orange stickles to highlight her belts and scarf.   A few embellies, I do not have alot for Halloween so maybe a trip to the store is needed. LOL


The inside shows the DP from a few years ago and the Martha Stewart Punch. My bats are from a stamp set from Stampin Up.  That is a cute set too.


I would like to enter this card into the following challenge:

Thank you so much for stopping by my blog today, 
wish you a very joyful day!
Kelly

Monday, September 24, 2012

Tilda Dancing With Stars

I love this little darling and made her into a Christmas card for some challenges that I wanted to enter.  


The DP is from a friend and is Echo Park, Very Merry Christmas 6x6 pad.  I used Spellbinders lacey oval die to surround Tilda and put liquid pearls around her and the die.  Tilda Dancing With Stars is colored with Copic markers on Cryogen paper.


The heart is dry embossed and then cut out, I put my favorite Tiny Text from Cosmo Cricket on it.  The Poinsettia is from Paper Trey Ink and now I wished I bought the matching stamp set that goes with.  I stacked the different sizes and glittered around each die and put a crystal brad on it.  My red ribbon is from Stampin Up last years stash.


You can see the stars I punched out in different sizes as well as silver sparkle paper, White card stock and then stamped with Paper Trey Ink Stars and then stickled around them with red.  I surrounded the whole inside square with Memory Box snow dies.


A side view to see the texture.


Inside are die cuts from Quickkutz and more Stampin Up ribbon and punched snowflakes.


May you all have a very nice week and thank you for all the nice comments you give me, I appreciate you.
Kelly

Saturday, September 22, 2012

Crepe Paper Dress Form

Good evening, I saw a awesome tag with a honey comb dress form made with Tim Holtz, die Sewing Room and I had to try it for myself.  The inspiration I found is from Chris Dark, you can find it  HERE.
She is so amazing with all her talents, you should really browse around her blog sometime, you will love her style. 
 Well I didn't know that you buy honey comb, I figured I would make it myself but it is not easy to do.  I will show you what I mean so that you do not make the same mistakes I did.  If you want a proper tutorial on making your own honey combed image you should check out Shelley's blog HERE as this is what I tried to follow.
Here is the form after I glued it.  I should have put it on the paper before I glued it as the more I worked with it, the combs were crushed and ruffled.


I used Melissa Frances Crepe paper in creme and folded it many times and then ran it through my Vegabond using Sewing Room die from Tim Holtz.  Then I trimmed it a bit and sewed down the middle of it.  I would recommend taping the back of the crepe dress to the green sewing room die before you glue the honeycombs. Lesson learned.


Here you can see a bit of what is left of a honeycomb.  I took each layer and glued the top and bottom corners and then the next layer midway from the top and midway from the bottom, then repeat until all the layers are glued.  Do not use liquid glue or wet glue, as my combs did not show nice as 5 layers of crepe paper stuck together and prying them apart ruined parts of the pattern.  Lesson learned.  

 Although this dress is cute but not at all what I was aiming for, so look at Chris's tag and you will see how it should have looked Chris' Blog.  Then after all this I found honey comb paper you can by and boy would that be easier, but not as challenging.  I cut 4 more in different papers to try it again.  After I get it I will post a better tutorial, may take a few days.

I know the inside of this card is strange, another try at a doily dress, hmm better get different glue, what a mess I made out of my papers and fingers LOL  I won't quite, I need to get this right, I love the look and it is fun.  I do want to enter this card into a challenge, the card is cute.
Thank you for stopping by tonight
Kelly

Friday, September 21, 2012

All In The Paper

Hmmm, not sure if Dancing With Stars Tilda would look good in green until I saw her on MME, DP "The Sweetest Thing".  I felt I did not need to put on that many embellishments for her either.


 She is colored in Copics and liquid pearls are used on the stars and corner embellies.  The corners are from Whimsy Stamps.  Tilda is mounted on a Spellbinders star circle which also created the tiny stars.


The sentiment is from Stampin Up.  First I stamped a Close to My Heart flower, cut it out.  Then I used a circle punch on the DP and  a circle punch for the sentiment finally stacked it all together. A butterfly adorned the top with star and liquid pearl. That is the sentiment.


I would like to enter this card into the following challenges
Thank you for leaving me kind and respectful comments on my blog!!
Kelly

Thursday, September 20, 2012

Costly but humorous

This week was interesting with all the chaos.  I am not complaining just sharing why I have been quiet on the blogs. So here are the highlights of my chaos.

 With 1brand new little antivirus disc, I wiped out 2 PC's in our home, 1 was the business computer! Yep all the accounting is gone, I do have it on a CD backup though.    I brought them in for a checkup and found that I needed to let the 4 years old go and purchase 2 new ones. So for 13 years of owning a Macintosh myself, I decided to put the money out there and replace the 4 year old PC's with Mac's.  OUCH!  I have never had one problem with my Macs other than the first one was older and I upgraded.   I had to set them up for our business and my daughters college  and then tutor 2 people on how they work, my brain is fried!

In the middle of that I started to rearranged my craft room in order to make space and for more efficiency. My room  had to wait while I fixed our computer situation.  I had started to cut out and color a card so that was  just sitting there waiting too.  Then, I hurt my thumb! I know how dumb is this?  I was unable to use my thumb for a few days, it is still sore, but better.  No cutting food, scissors, coloring, taping and clicking the laptop mouse I felt like a little kid needing help.  LOL!

  It always goes like this at my house, When one thing goes, everything follows and then it goes colossal. "oh well" all is fixable but too much money made me a bit sick.  Now if it were for crafting items that would be different, I am just kidding, although how fun to spend that kind of $$$ in crafting all at once. hmmmm.

Now we did have some fun working together to get things  back in order and at our home we just take it all in stride and drink alot of wine!  LOL  Actually, laughing and goofing around made it all better.
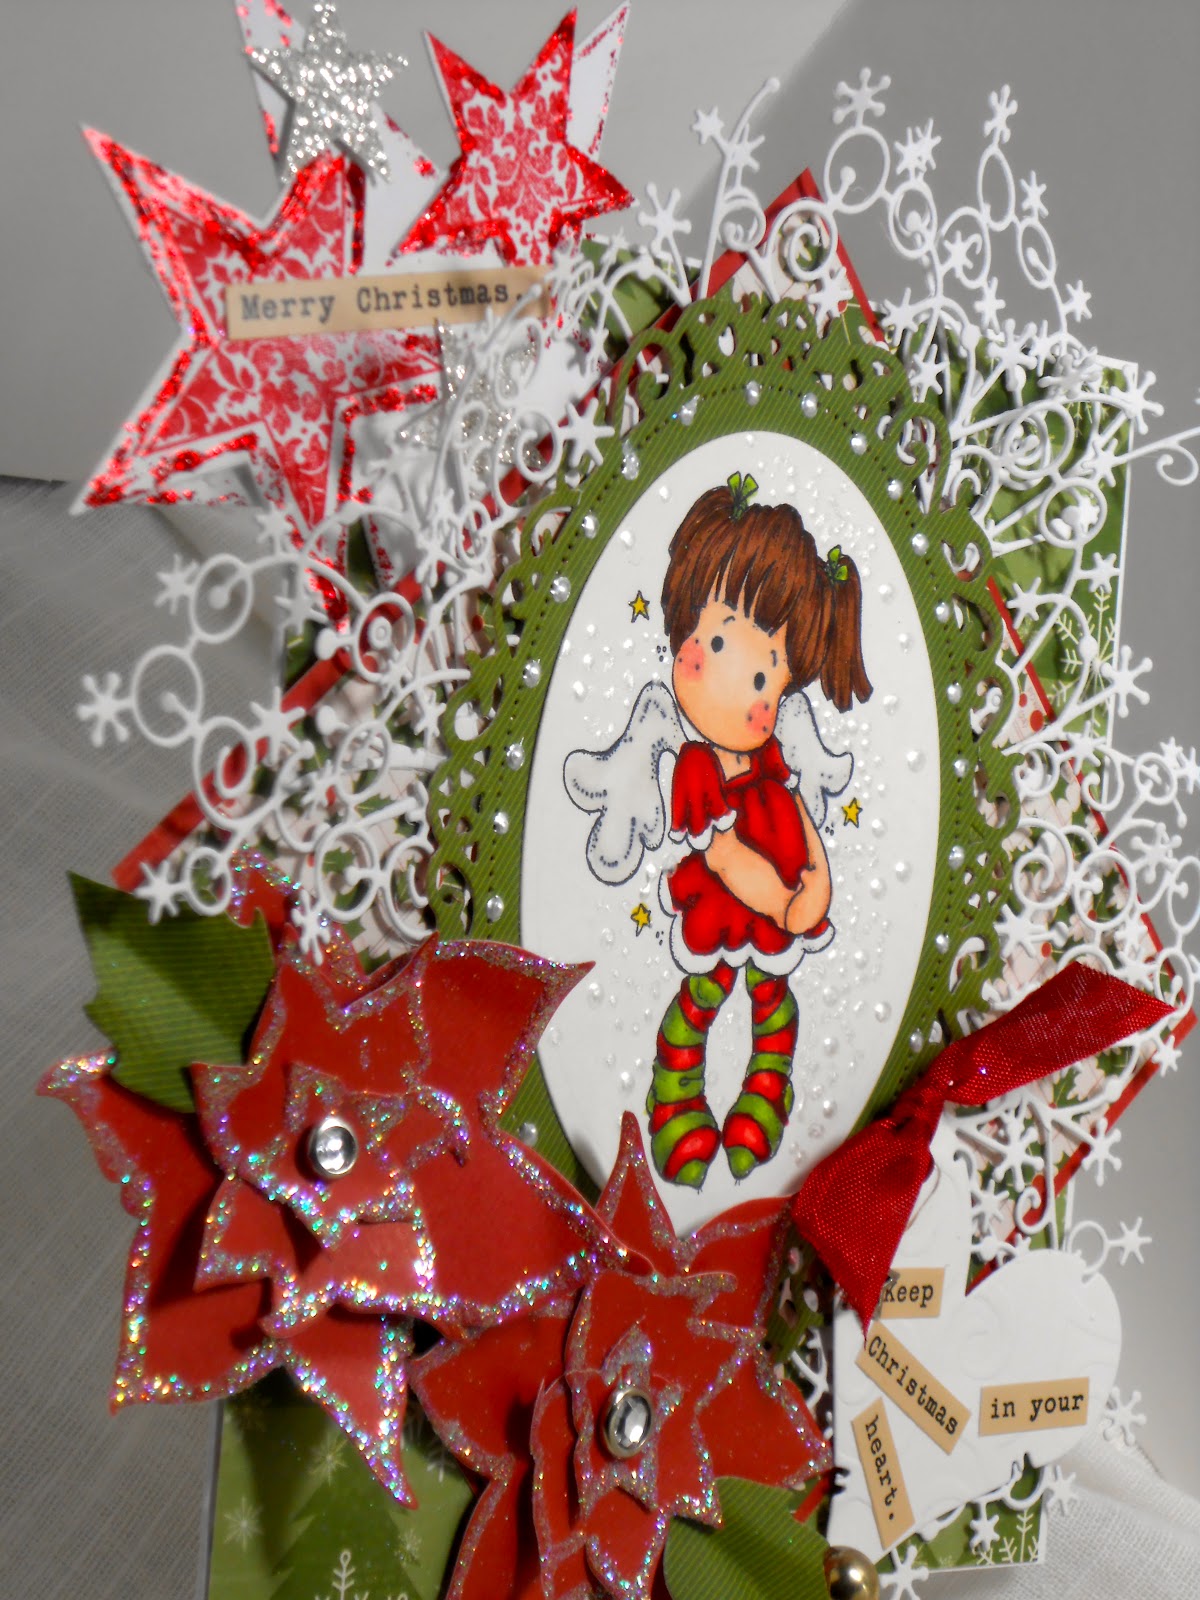
This morning I decided to test out my thumb and I finished this card.  Look! I am able to type because  my peppermint oil is keeping my thumb from hurting so here is my card.

 Gotta love those Cosmo Cricket "Tiny Text" sayings!

 I used Copic markers on Cryogen paper, love the paper.

 I cut 1 circle out and halved it to make one for the top and one for the side. The DP really set the tone for how this was going to be embellished.
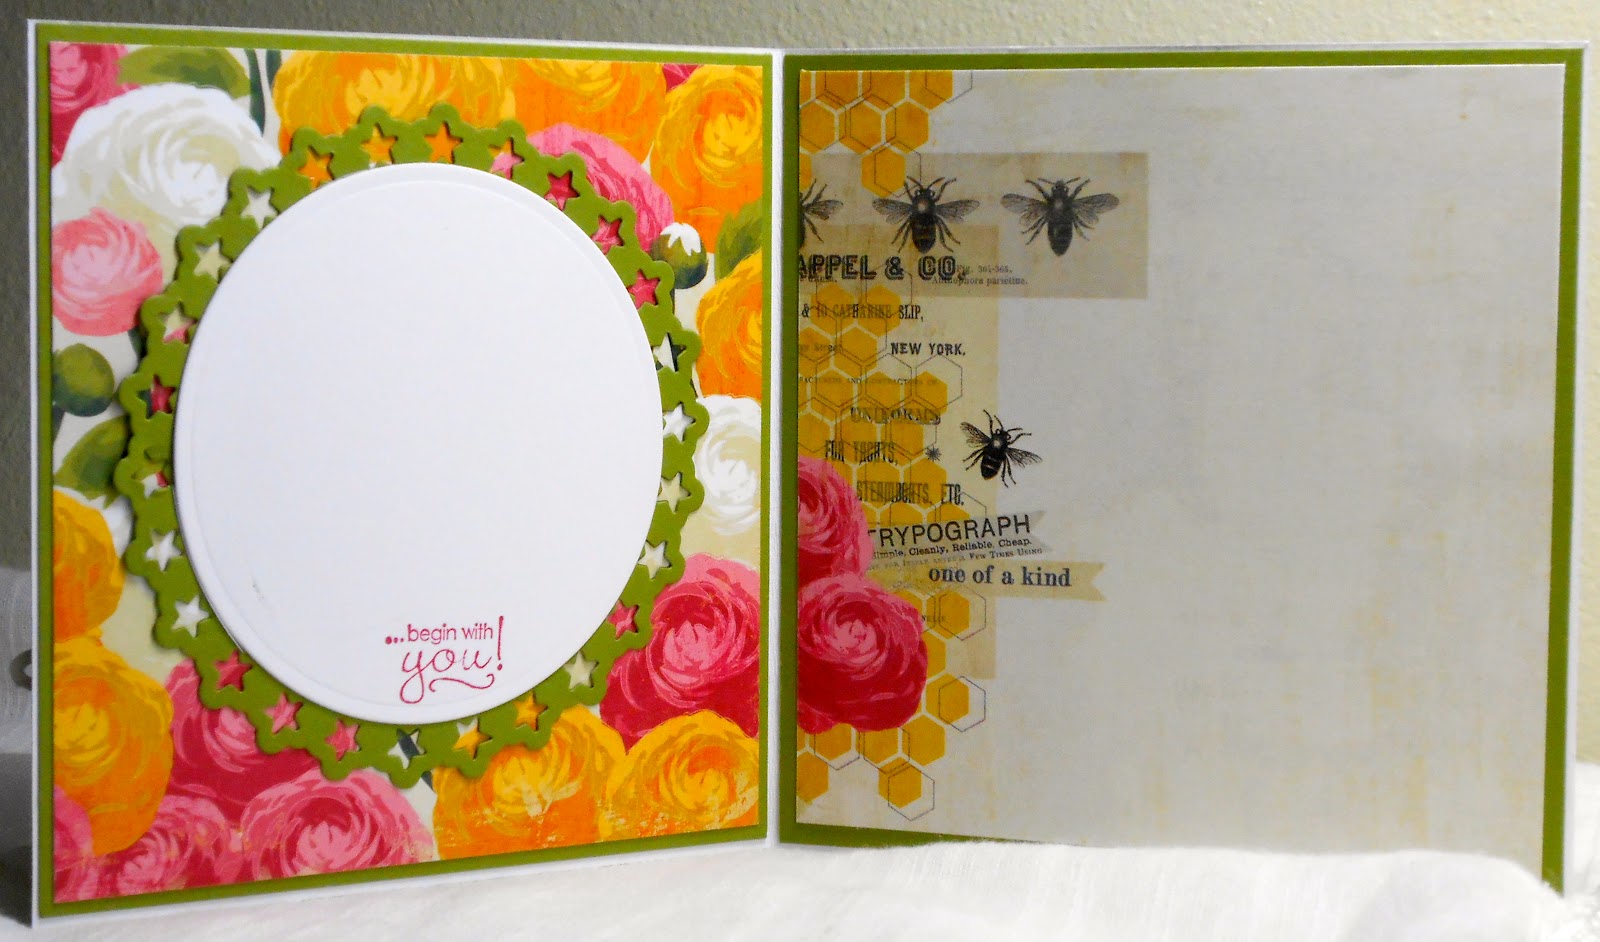
 Inside the card Edwin say's it all for us "Artists",  our Magnolia cards are the inside art style we all have.  Each one of us does it different and that is why it is fun to visit our blogs of art.


So for a little fun I will share some photo's with you

I added this cubby and the dogs thought it was for them!


This is what I did with the added cubby and I found those 2 cute baskets at Target and my Maggies are in it.  They look so pretty in there.


Here is the layout of my space, when I can I will add detail photo's of it to my picasa album.  My mother-in-law made all the embroidered dresser cloths lining my shelves and the lace table cloth is from her too.  I love having family memories and gifts from my friends around me when I craft.


Thank you for taking the time to stop in and visit with my woes,  hope you are having a great week
Kelly

Thursday, September 13, 2012

Book Card

Making anything other than a card is a bit of a challenge for me so this one is not perfect by any means.  I will use it for my own reference.  One good thing is the Copics on Cryogen paper are awesome.  This is my first time trying the Cryogen paper and I cannot believe how perfect your images look.  
Here is my Book Card

The front of the book is DP from years ago, then I covered it with a handcut tree and punched pumpkin.  The tree I hand cut and then ran through my Papertrey Ink embossing folder.  I stickered the words from Cosmo Cricket Tiny Text.  The pumpkin are 5 oval punches and distressed  all round them in Vintage Photo.  I used a die to create the vines on the pumpkin and finally added a few Whimsies and Prima nest.


Cosmo Cricut Tiny Text


The inside of the Book card, the colors on the right are darker but I think most of it is from the lighting and camera and I probably distressed it too much.  


I used Memory box dies in the corners and Spellbinders circles and scallops to adorn Tilda in Ugg's.  I masked her with the Shabby Fence.


The box part of the card has a older Tilda inside.  She is so appropriate for a Autumn card, sticks are bare, lonely and brrrr feeling about her.  I prefer the summer.  I used a EK success punch for the frame but I only broke 2 punches trying to make this part of the box.  I think they were just ready to go, you know they do not make things durable anymore.


A side view of my book.


I would like to enter my project into the following challenges.

Hope you have a wonderful Day!
Kelly

Wednesday, September 12, 2012

Copic Storage

I was at Target today and I saw this great wooden box with dividers and grabbed it!
It is at Target for $19.99.


It has six compartments, all wood, the front is chalkboard.


All my Copics fit perfectly, actually I need to buy more to fill it up!  Just Kidding, I do not need to, if my husband added these up!!    Probably costs more than his sawzall's or as he would say "his tractor".
This craft addiction is very healthy and makes us very happy, right hun?!!


I just had to share this box with you, I can pick it up and bring it to my desk all at once and it still looks pretty.
Kelly

Tuesday, September 11, 2012

My Cards Preserved As Artwork

I had some cards left from the Art Crawl that did not sell.  I wanted to preserve my cards that I made so in the future my kids can enjoy it, like I enjoy my mothers' oil paintings.  Or maybe when I am in the nursing home, later in life, It will bring a little joy to my heart seeing what I did.  Kind of like scrapbooking,  just preserving our memories.

For a while I couldn't figure out what to do with them until yesterday, a light bulb went off.  I modge podge each card, insides and out to canvas.  I used Matte Finish Modge Podge.
I had crackled the little Christmas Bear image and that was just a weee bit testy but he looks great.


These two photos give you a idea of how big it is and how the texture still shows from the card.


I modge podge each card, insides and out to canvas.  I used Matte Finish Modge Podge.  I gently rubbed the card to get it to stick firmly to the canvas and then I modge podged over the top of each card.  I did not do the pearls, ribbons, pins, or hard embellishments.
I had crackled the little Christmas Bear image before and that was just a weee bit testy but he looks great.  Then I taped my mother-in-laws lace all around the canvas.


You can be messy, see it doesn't show, you have clear subtle texture on each card. 


For my artsy signature I modge podged my business card onto the end.


I mounted it to my wall and now it is part of me for a very long time. This wall will get rearranged, I have to have everything painted in here first so for now that is where it will go.  I need it to be symmetrical with the rest of the room.


This was so easy to do and cheap.   My 24x32 piece of canvas was 50% off and so was the Matte Modge Podge.  It took me 1 hour to put it all on and it dried quickly.  Laying out the cards was harder than any of it. 

I hope you are a little inspired by this to preserve your gorgeous cards that I see on your blogs.  Why not enjoy them ourselves.  
Kelly